
To configure the BudgetiX plugin, make sure to remain logged in as a system administrator, and navigate to the Plugins tab in the user interface:

When you’ve just installed BudgetiX, it will be the first one listed on this page. If you’ve installed other plugins later, it will be a little bit further down the page. Find the line for BudgetiX and click the Details button on that line to navigate to the plugin’s detailed information page:

You will now see an overview of the plugin’s components. One of them has a “Settings” link, which you should click to move to the settings dialog:

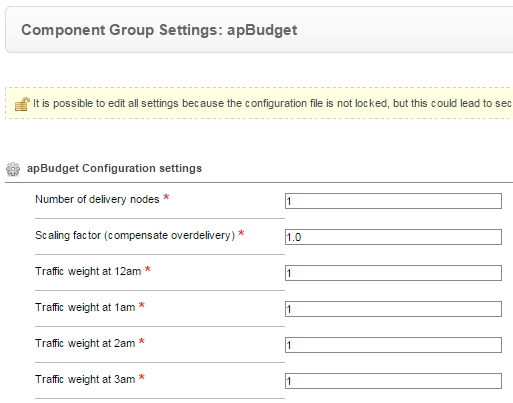
BudgetiX configuration settings
There are 3 types of settings that need to be entered to make BudgetiX work correctly:
- the number of servers that are being used for your ad delivery;
- the scaling factor that is used if over delivery needs to be compensated;
- the traffic weight for each of the 24 hours in the day.
Each of these groups of settings will be discussed below.
Number of services (delivery nodes)
Enter the number of servers (delivery nodes) in your hosting infrastructure that are being used. This ensures that BudgetiX will correctly allocate the appropriate portion of the total of a campaigns budgeted impressions to each of these servers. If you have just a single server, leave the value at 1.
If you make changes to the hosting infrastructure in the future, please make sure to also update the number of servers in BudgetiX’ settings.
Scaling factor (compensation for over delivery)
This setting will help you compensate for a situation where over delivery occurs (for whatever reason) when using BudgetiX. By default this is set to 1.0 and it should not be changed.
If you notice, however, that campaigns where you have enabled BudgetiX are consistently over delivering, you can use this to reduce that. Please consult your account representative at AdserverPlugins.com for guidance.
Hourly traffic weight
These 24 fields each represent the weight of one hour’s traffic in a full 24 hour day. It ensures that BudgetiX will allocate the appropriate portion of a campaign’s budget to each hour of the day, to help avoid going through the budget in the first hours of the day (or rather: night).
There are several ways to determine the weights you need to enter:
- For example, it could be the percentage of your total daily traffic that usually occurs at each hour. Enter it as an integer. If 3,9% of your daily traffic occurs between 9 and 10 AM, you could enter 39 for that hour. And then if 5,5% of the traffic occurs in the next hour, you could enter 55 there. And so one.
- Another way to determine this is to lookup the global statistics of the last 7 days, and to look at the distribution by hour. Let’s work with an example of an ad server that had 712 million total impressions in a 7 day time frame. In the time frame between 1 and 2 PM, the number in those 7 days was 45 million impressions. Simply enter the number 45 in that hour, and so on. The advantage of this approach is that you don’t have to calculate the percentages, BudgetiX will do that for you, by summing all the weights and allocating the correct portion to each of the hours.
With these configuration settings entered and saved, you’re now ready to start Using the BudgetiX plugin.